 |
My name is Sandesh Shrivastava. Currently i am working as a freelancer .Using 3ds Max since 2011. I have completed my diploma from MAAC Gwalior. I did my Engineering from IT branch. But I thought 3d Animation is my dream. This is what I want to do something creative. So I choosen this field.I use Max with Vray because I love the lighting of Max. But I love to make new things creature and Animation too.
|
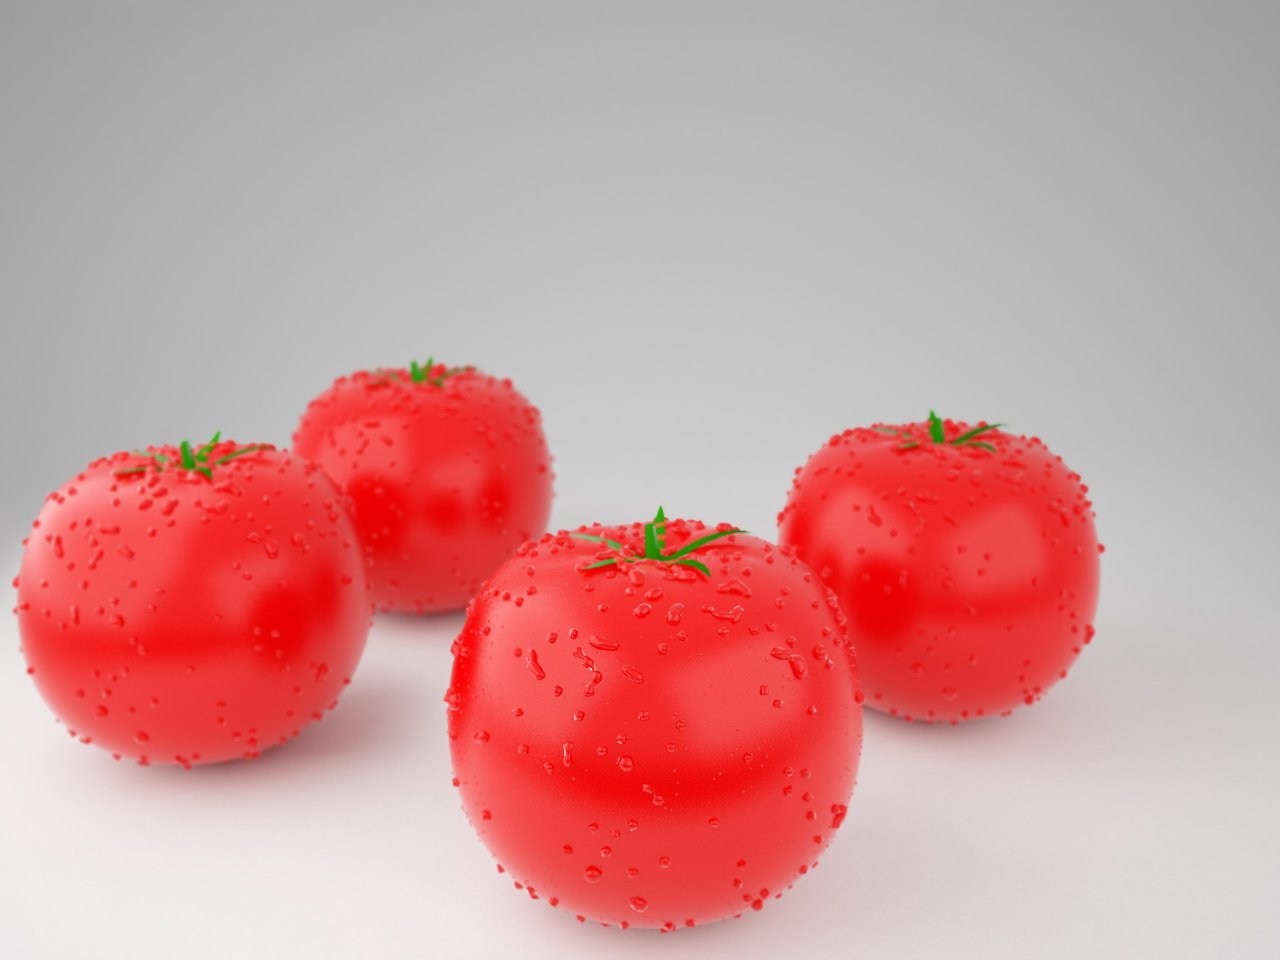
In this making, I am going to show you, How to create a photorealistic tomato with 3ds Max 2013 and V-Ray 2.30. We will use Photoshop to combine passes. In this case I will use only one pass that is Z-depth. Why did I use this pass? I will tell you at the end of this making. In this making we will cover these steps-
1. Modeling of Tomato, leaves and Water drops.
2. Studio lighting setup for photorealistic render.
3. Vray physical camera settings.
4. Creating water drops with pf source and parray.
5. Understanding the render settings.
6. V-Ray fast sss2 (sub surface scattering) shader for tomato.
7. Compositing in Photoshop.
So let's get started. First we need to create a sphere. I go to geometry tab and create a sphere as shown in image-1.
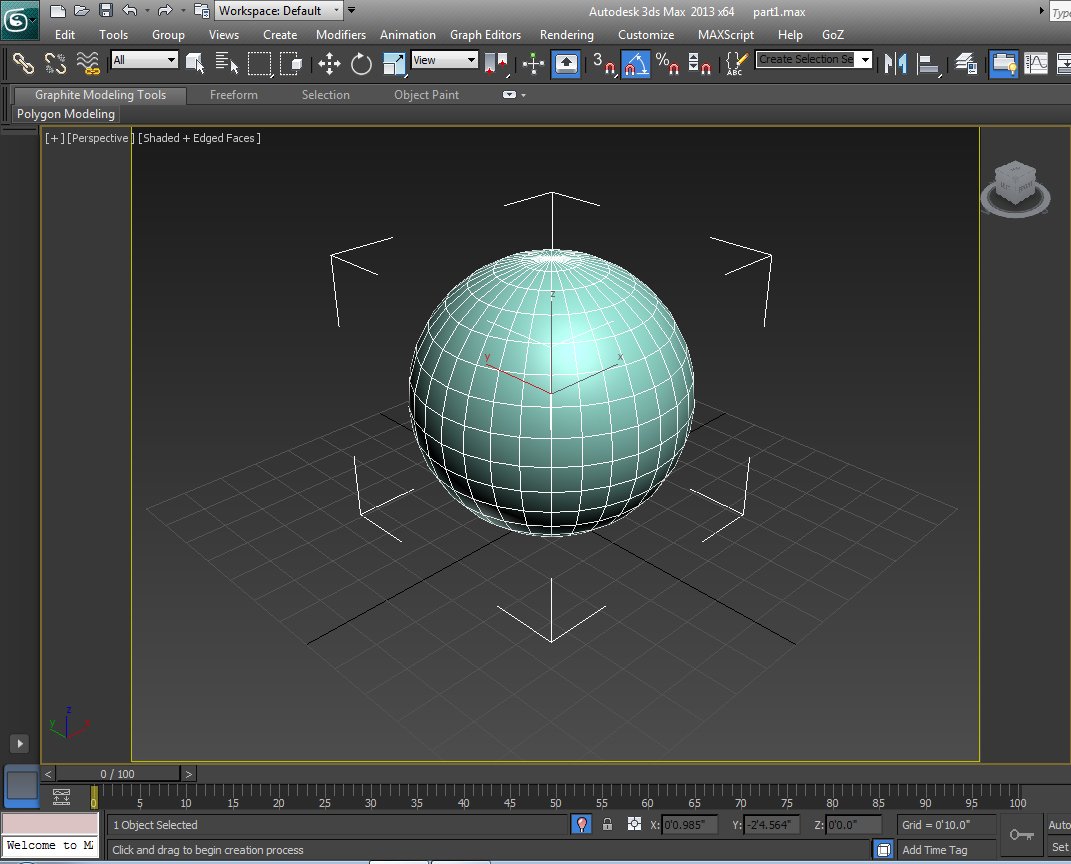
I don't change the segments of the sphere. Ok now I convert this sphere in editable poly so that we can modify it easily.
Just right click on sphere and convert to editable poly. Now we will use NURBS toggle so that we can get smooth result.
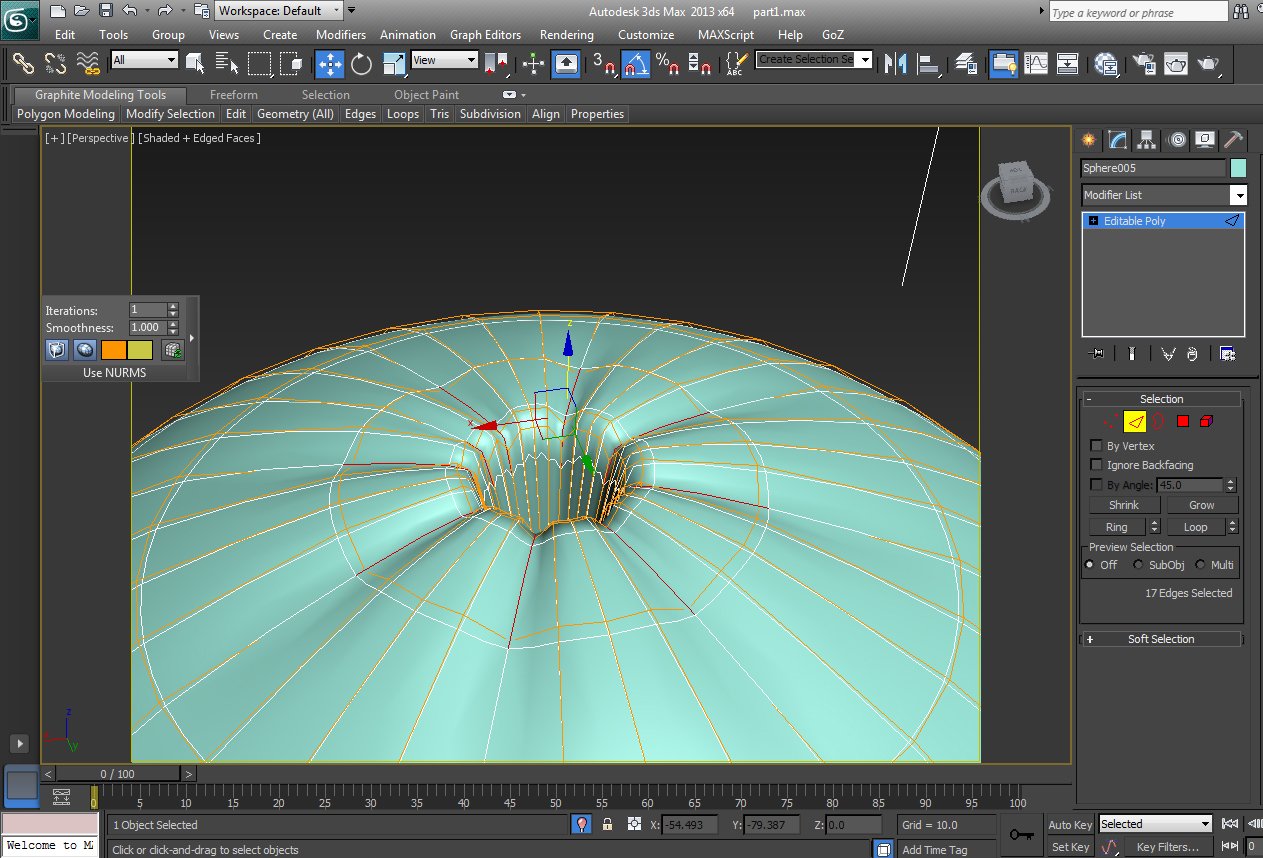
Now select the top vertex and extrude it inside as shown in image-2.Now I select some of the edges of the sphere with
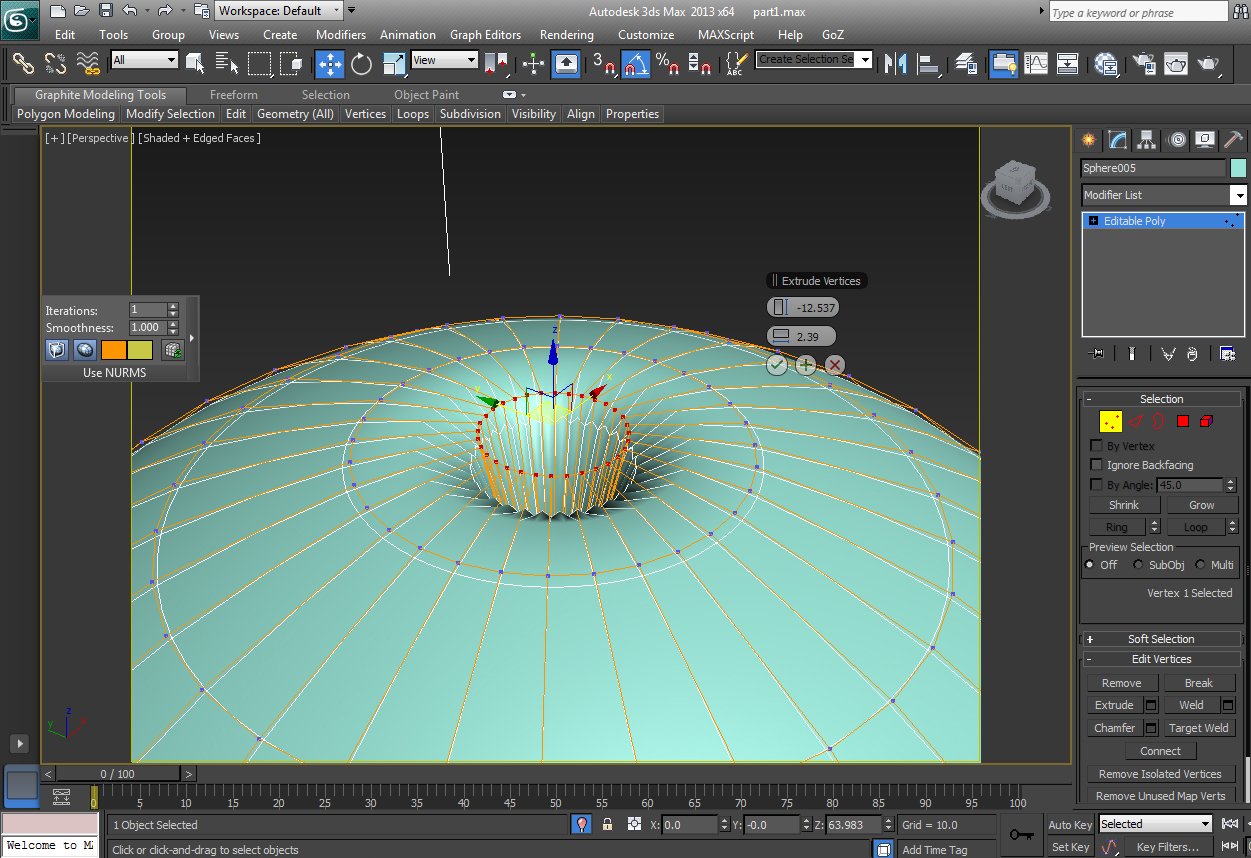
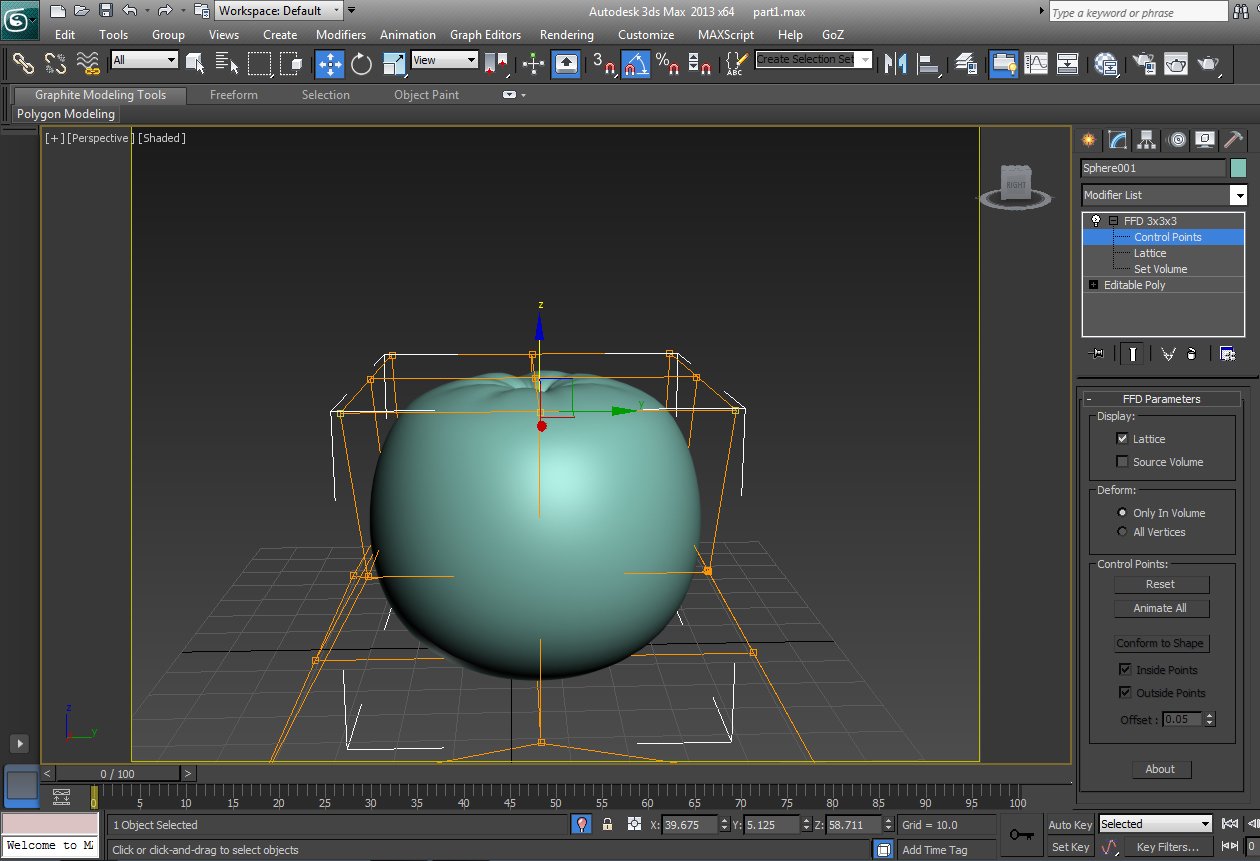
NURBS toggle turned on and pushed them downward through move tool as shown in image-3.After that I use ffd modifier 3*3*3 to get the shape
Of the Tomato.
Now it looks like a tomato as shown in image-4.
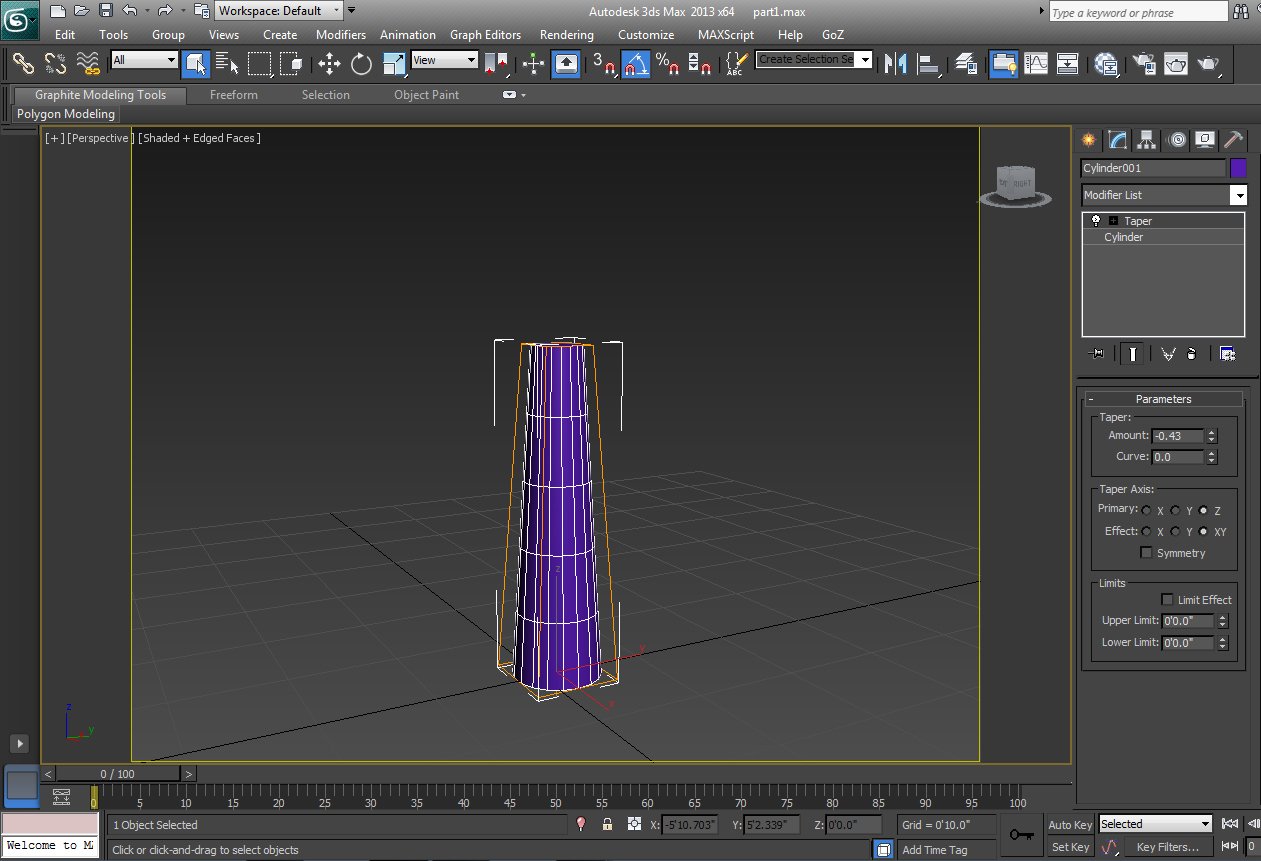
Now we will create the leaves of Tomato. For that I use cylinder with 15 segments, and taper modifier you can use ffd modifier too, to get the shape like this as shown in image-5.
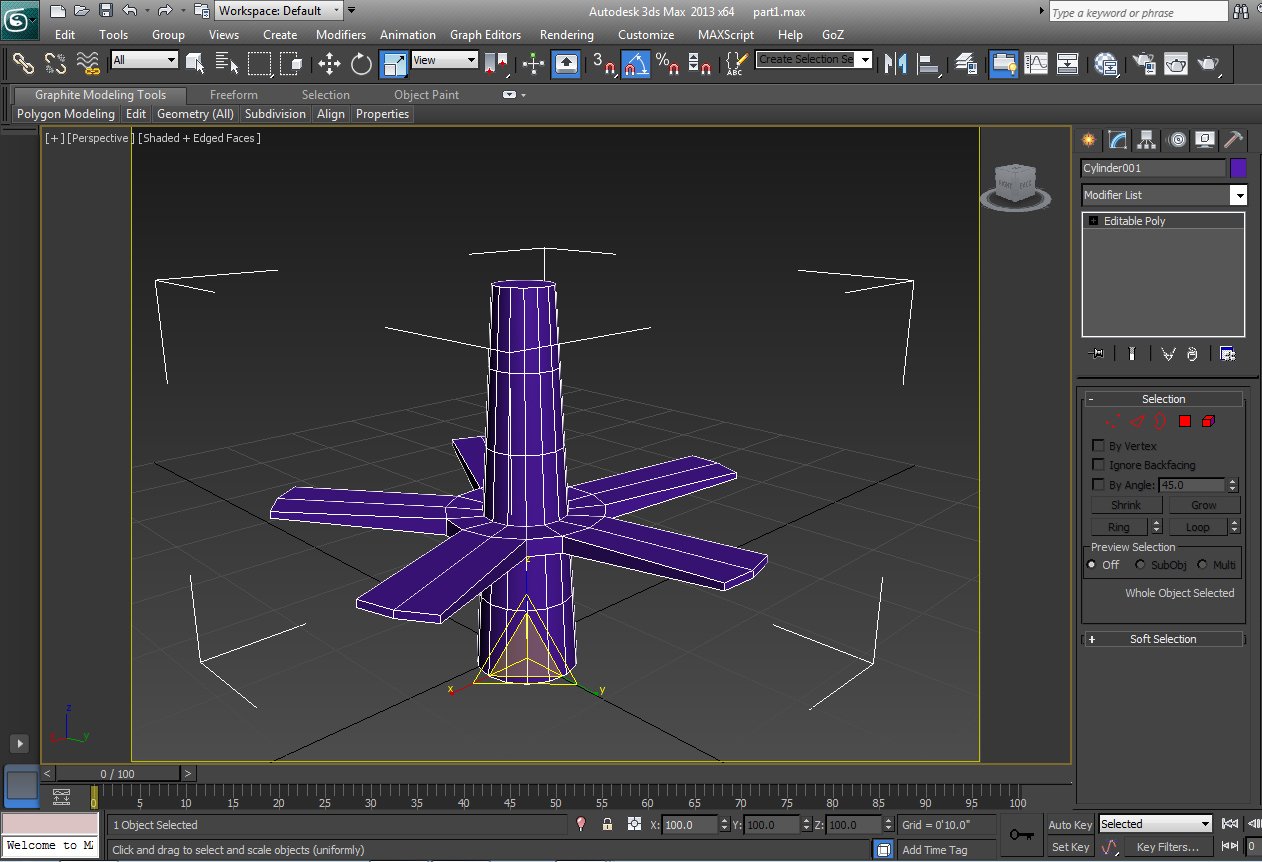
Now I select 3rd last loop and I use chamfer to create another edge. You can use connect too. After that I select all polygons between those two edges and extrude it. So you will get a circle around it. Now select 2 polygons and then leave one polygon so that you can get 5 pair of polygon that is selected now extrude it again. Your model should look like as shown in image-6.
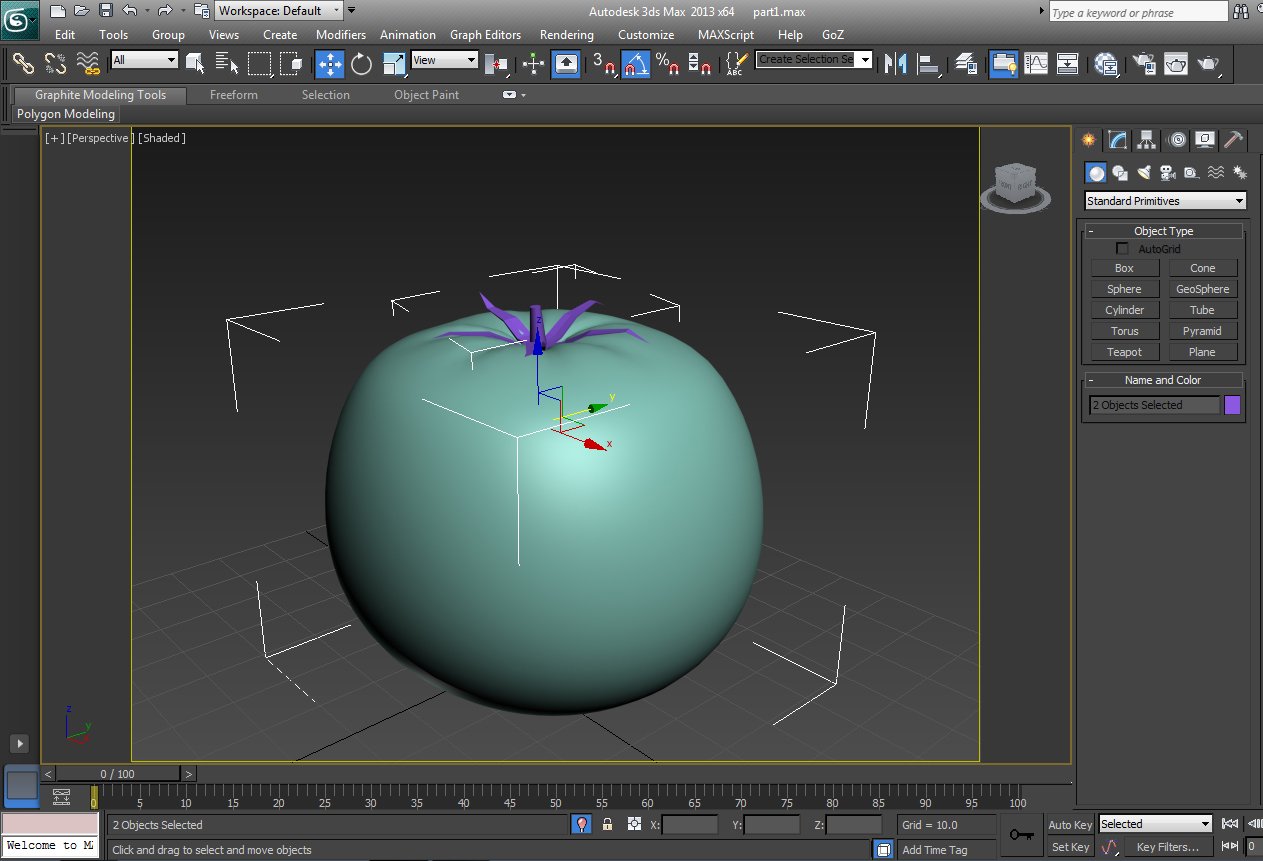
After some tweaking you can model this as shown in image-7.Now arrange this leaves on your tomato model your model will look
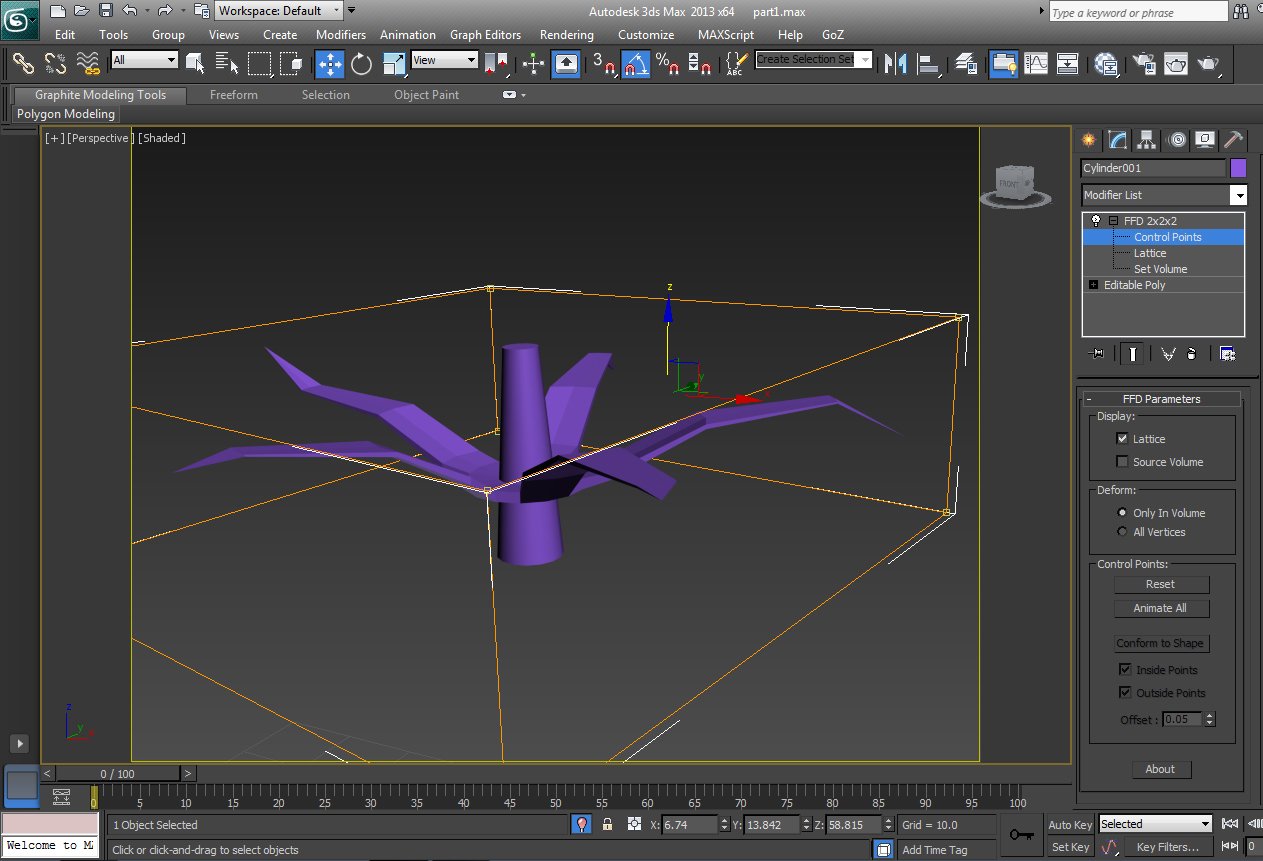
like as shown in image-8.
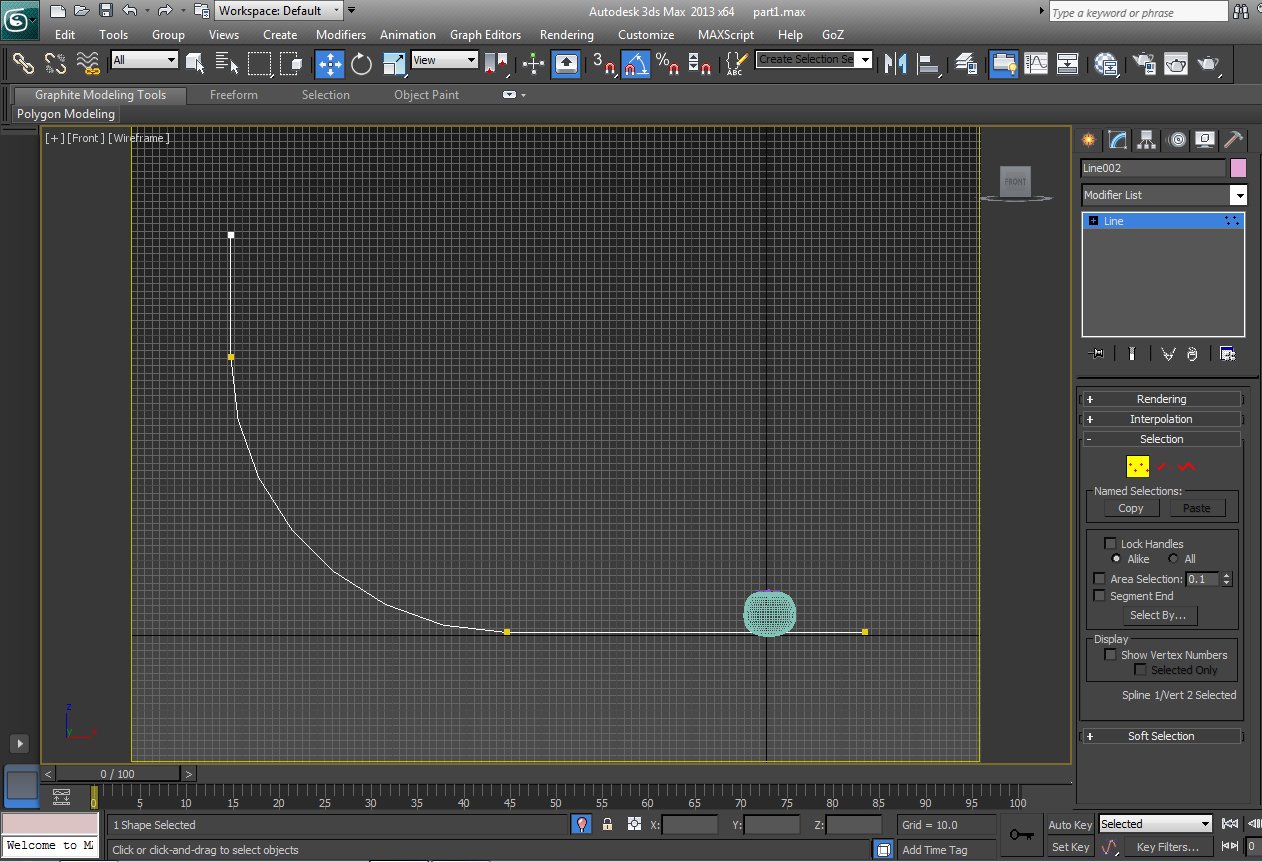
In this section we will create a studio light setup for photorealistic rendering. Let's get started. Go to front view or any view you want to create L shape from line tool make sure our tomato should be nicely placed on it. Now go to modify panel and select the corner vertex of this line and use fillet to make curve between to edges. As shown in step 9.
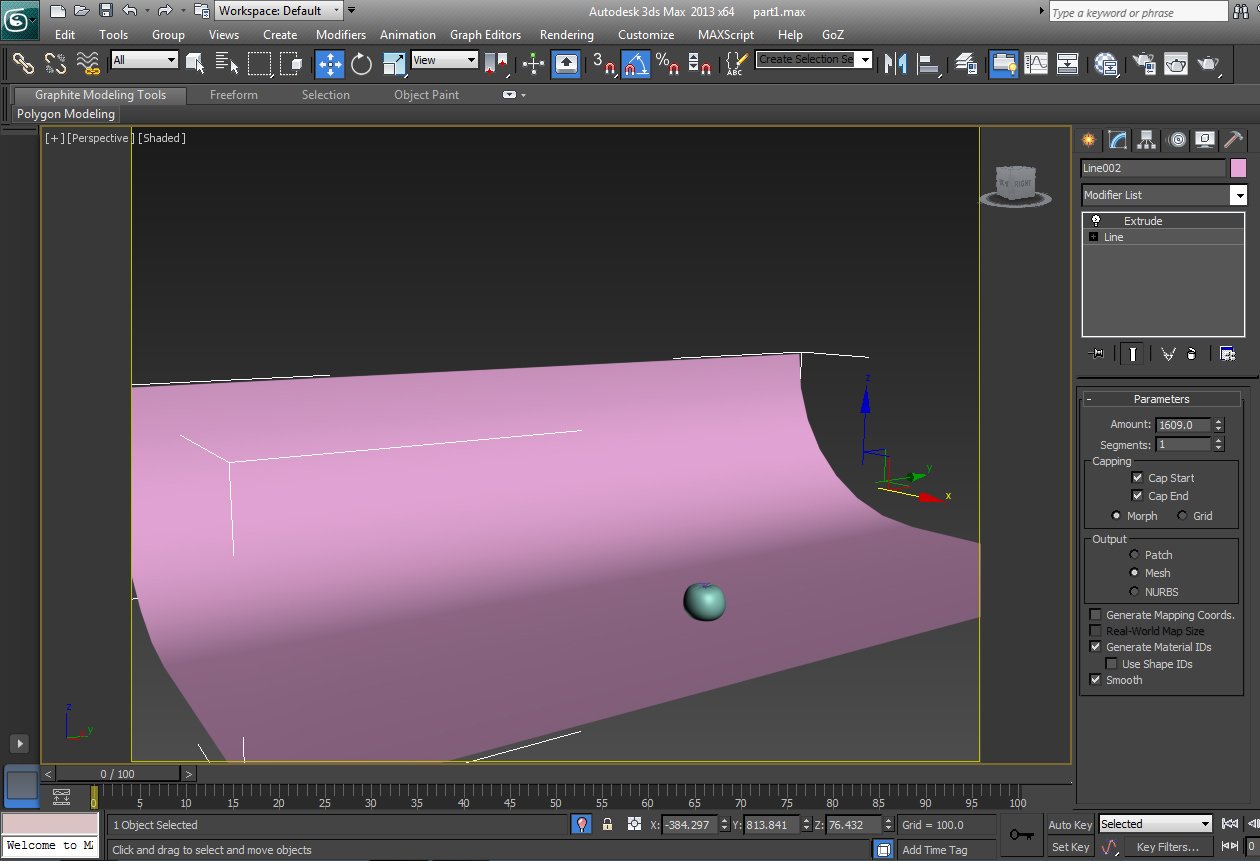
Now use extrude modifier your model will look like this as shown in step 10. Now let's create the lights. Lights are very important in any render. It can make things realistic. If your light setup is good you can get very good results. So in this case I use total 3 lights.
1. V-Ray plane (2lights).
2. V-Ray dome light.
I use 2 V-Ray lights (plane). With the intensity of 100 and 80. As shown in step 11. I use V-Ray dome light too with the intensity of 15.
It creates very good contact shadow.
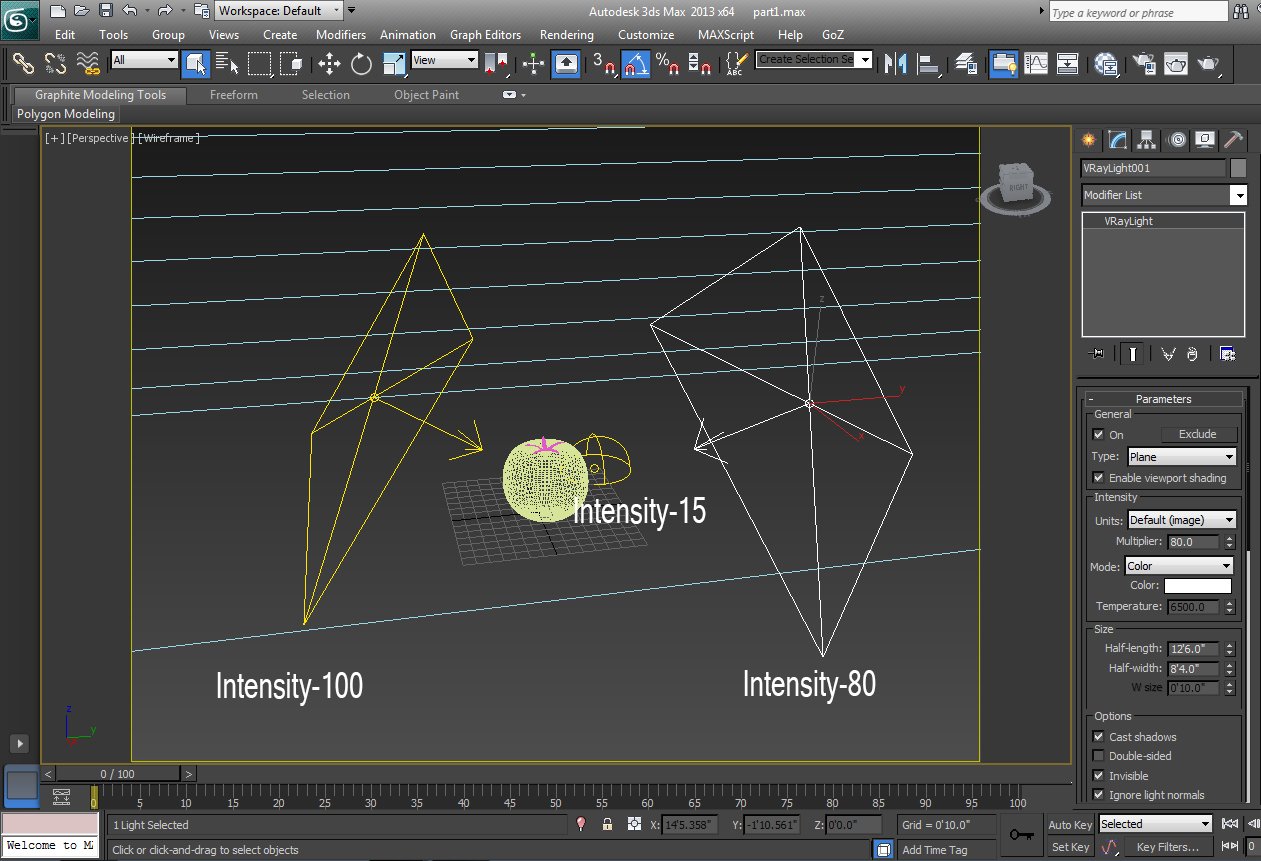
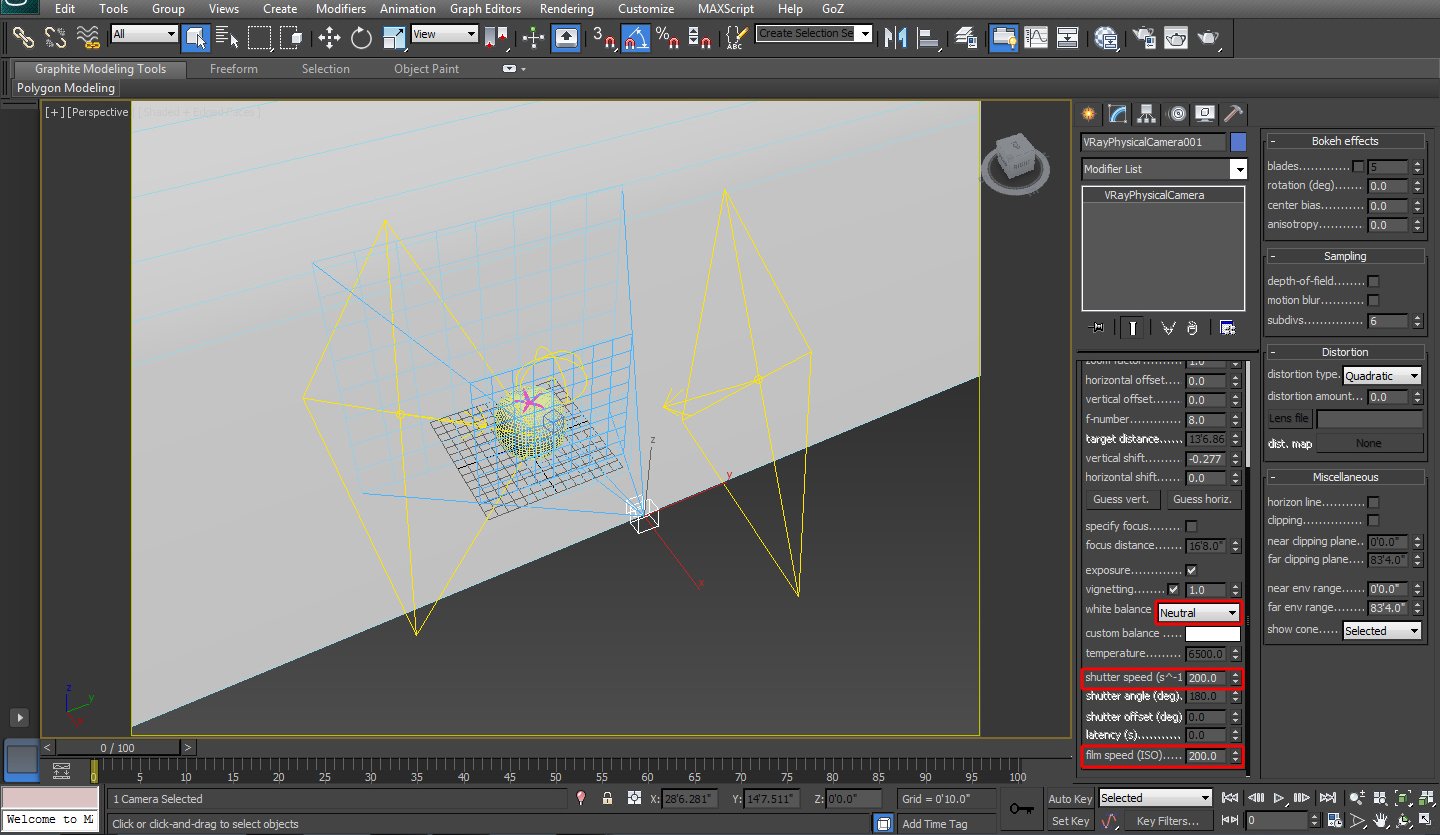
Now if you render this scene your scene will be very bright because of exposure. To fix this we will use V-Ray physical camera. Let's play with V-Ray physical camera settings. Change the white balance to neutral. Shutter speed leave it default which is 200. Film speed value will be 200.
If your scene is dark you can increase the film speed value. It depends upon your scene.
Now we will do some test render. You can do this at last but if our lighting will not well, we can not see the material's reflection, colour etc. That's why I create the studio light setup before texturing.I created a material which is V-Ray sss2 located in V-Ray advanced materials just set this to custom and I used simple gray material to background and leaves.Now hit render as shown in step 13.
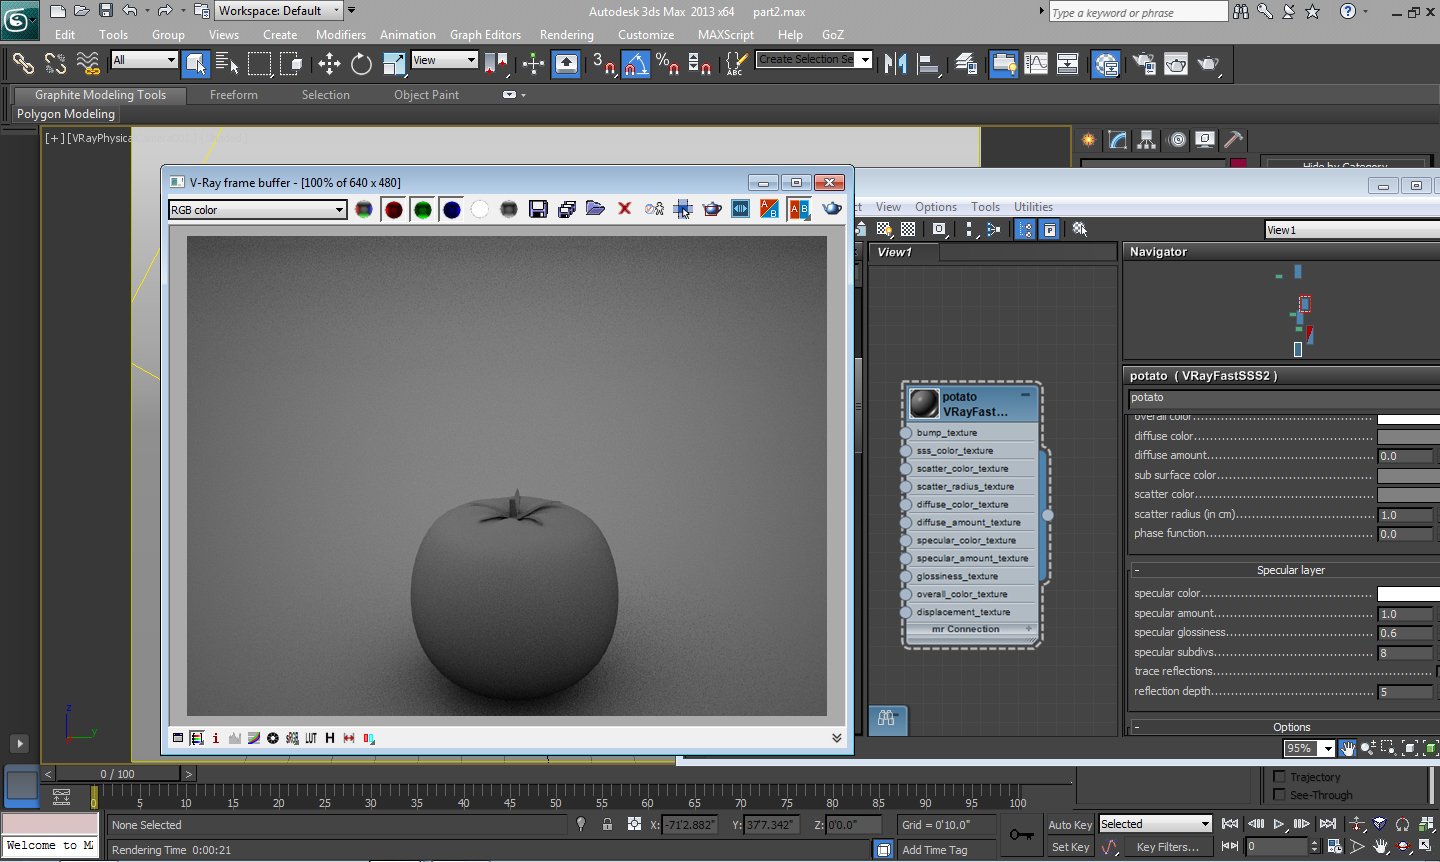
You can see our render image is very dark and lot of noise is there. We will fix it through render settings of V-Ray.
As shown in steps 14 go to frame buffer and turn it on. We use image sampler type is "Adaptive DMC" and ant aliasing filter will be Mitchell-Netravali. Set the color mapping to exponential, and the gamma value is 2.2.You can turn on sub pixel mapping this option controls whether color mapping will be applied to the final image pixels, or to the individual sub-pixel samples.We turn on clamp output, if this is on, colors will be clamped after color mapping.Now we move on to indirect illumination tab. I set the primary GI engine to Irradiance map and secondary GI engine to brute force you can use light cache too.
In Irradiance map settings change to current preset to very low. It will reduce our render time.
Check the show calc. Phase option and set this to show new samples as brighter.

Now hit render you can see the result in step 15. Our image is very clean very less noise is there.
In V-Ray fast sss2 shader option use single scatter to raytraced (refractive). It passes light through object more than other option. I used simple green material for leaves and I used gradient map in diffuse you can use texture if you want.

Now let's create the tomato material. Go to the V-Ray fast sss2 material. Use the settings as shown in step 16.In V-Ray fast sss2 shader option use single scatter to raytraced (refractive). It passes light through object more than other option. I used simple green material for leaves and I used gradient map in diffuse you can use texture if you want.
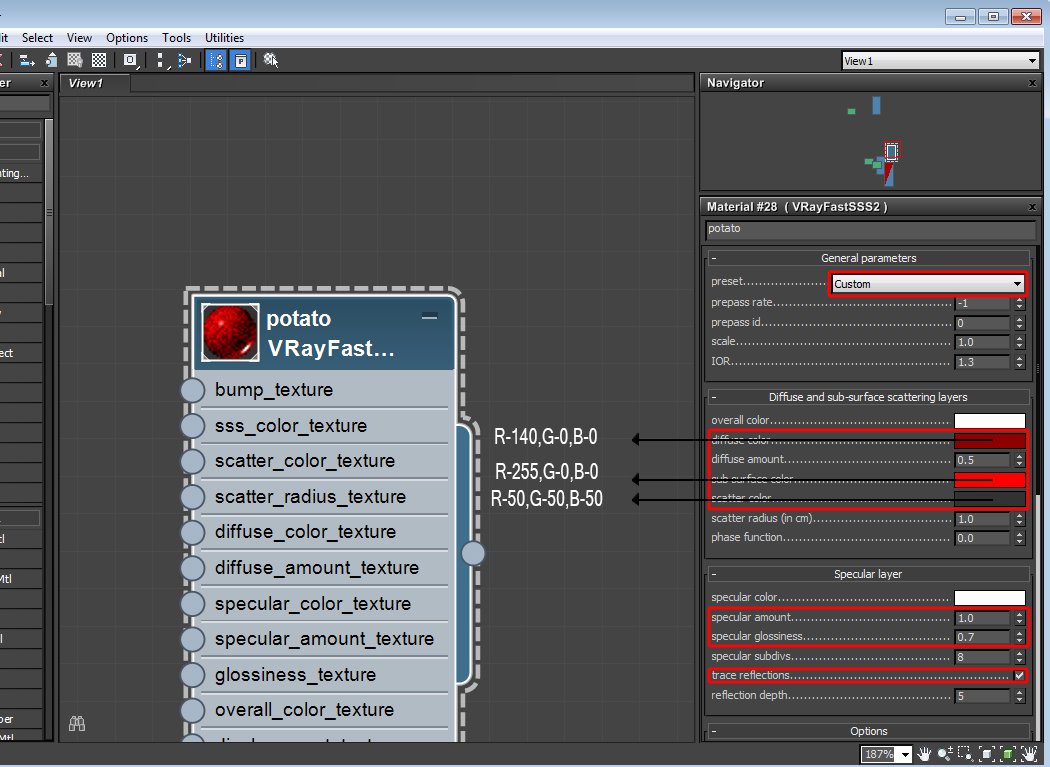
Now let's do one test render. You can see our object is looking like a tomato as shown in step 17. But still it is looking not so real.
To make this real we will make some water drops.
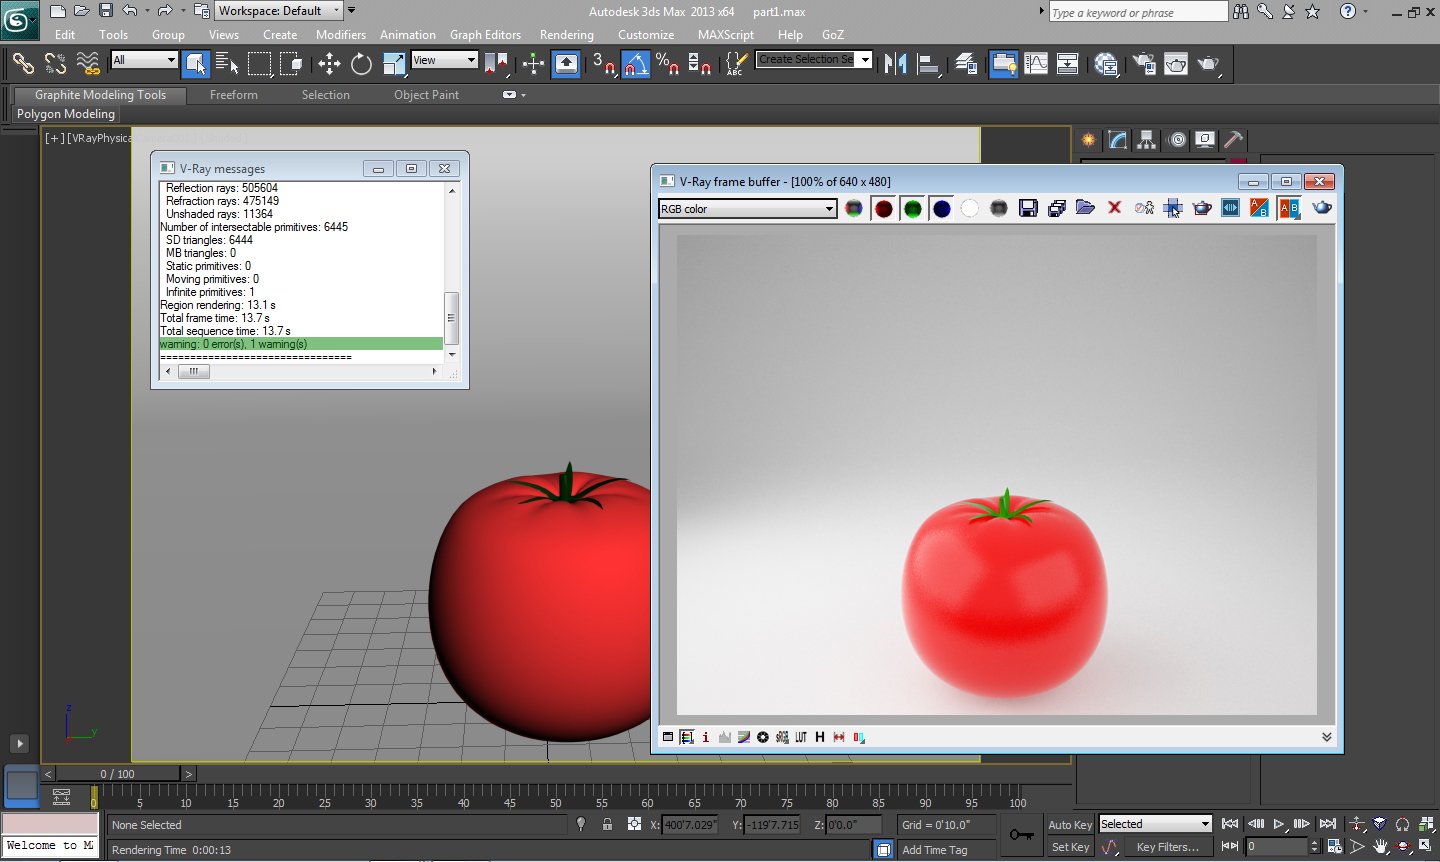
To create small drops I will use pf source in Event I will use position object operator event. Click on position object and in position object parameter you can see the emitter object click on add object and select your sphere you can see lot of dots on sphere now go to display in event and select geometry now you will see mesh in place of dots now go to the shape and select sphere 80-sides scale it and give some variation as shown in step 18.
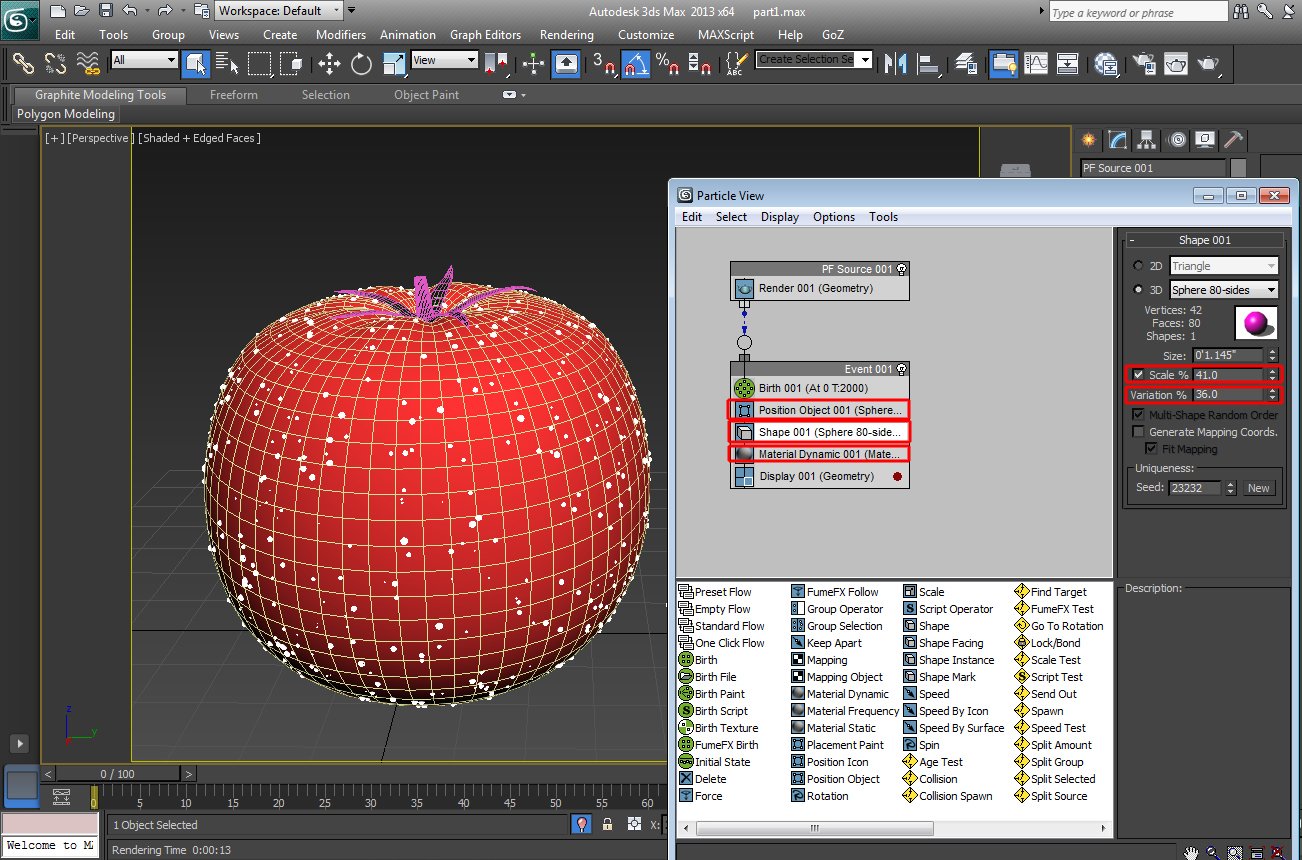
Now let's create big drops for this we will use PArray which is located into geometry/particle system. Click and drag the parray. Select your object through pick object use the settings as shown in step 19 under the particle type/ Metaparticle parameters/ set the viewport value and render value 0.9. It will give more dense mesh.
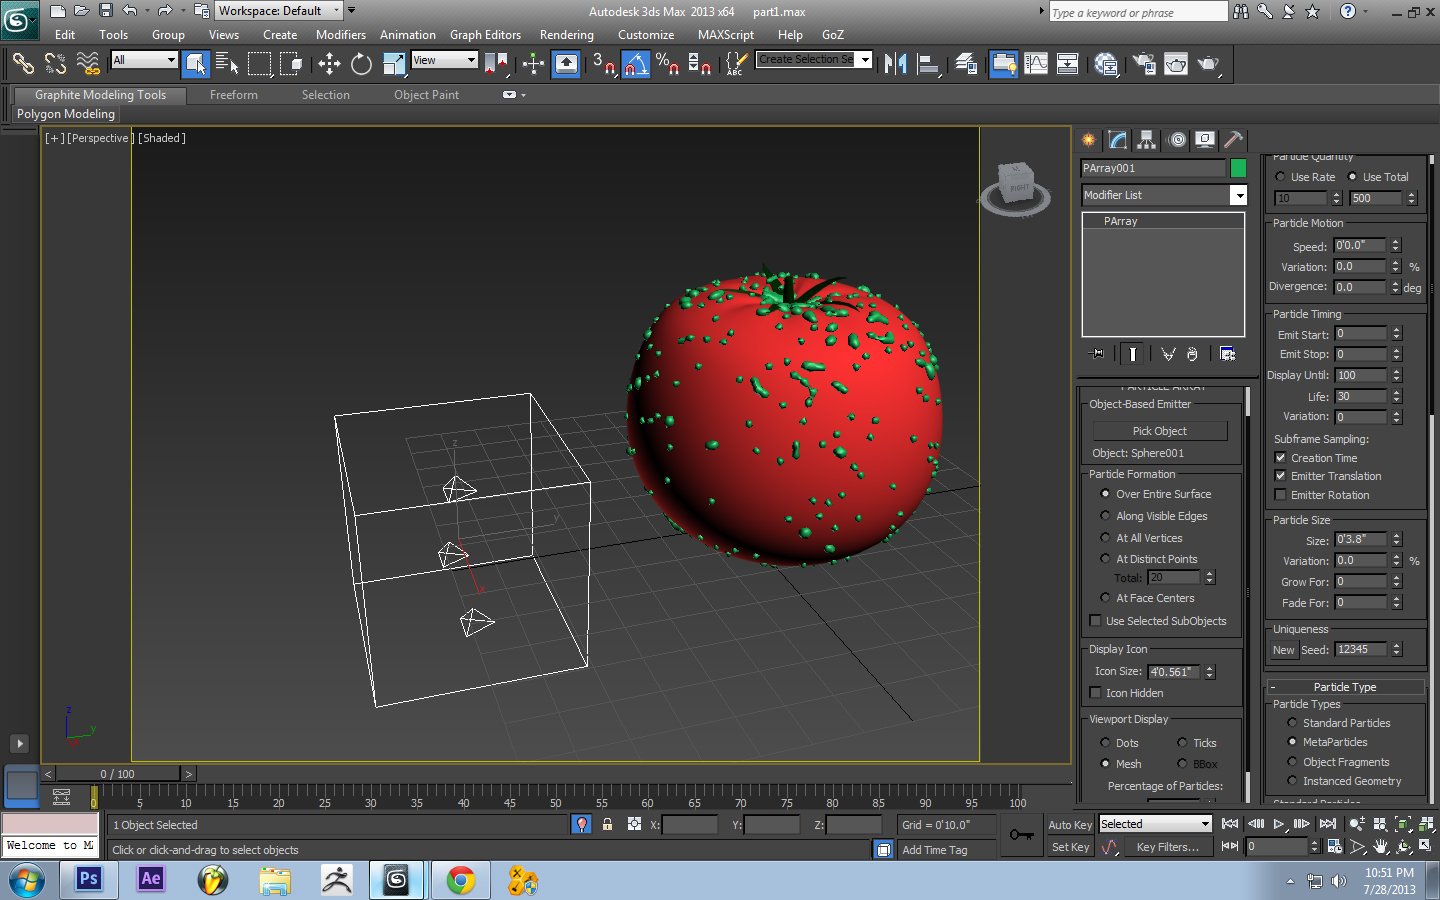
Now we will create water material. Use the settings as shown in step 20. I used noise map size (5.0)
In the bump map of water material. It gives more realism to water material. Now before the final render I want to use one render element you can use other render elements if you want. I will use Z-Depth render element. Z-Depth render element is basically used to create depth of field I will show you how we will create depth of field in Photoshop by using this render element. So I made some copies of my tomato.
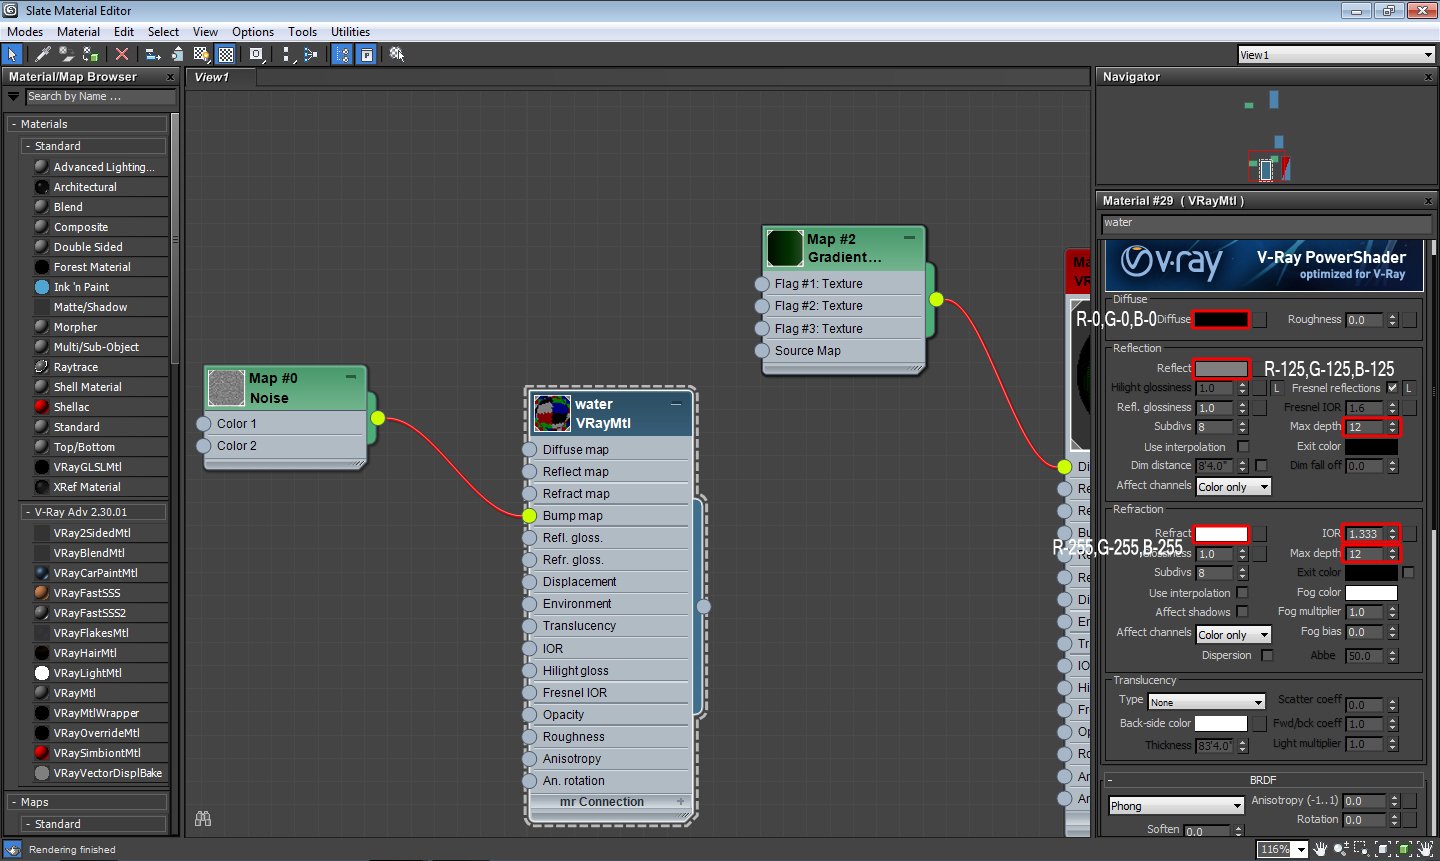
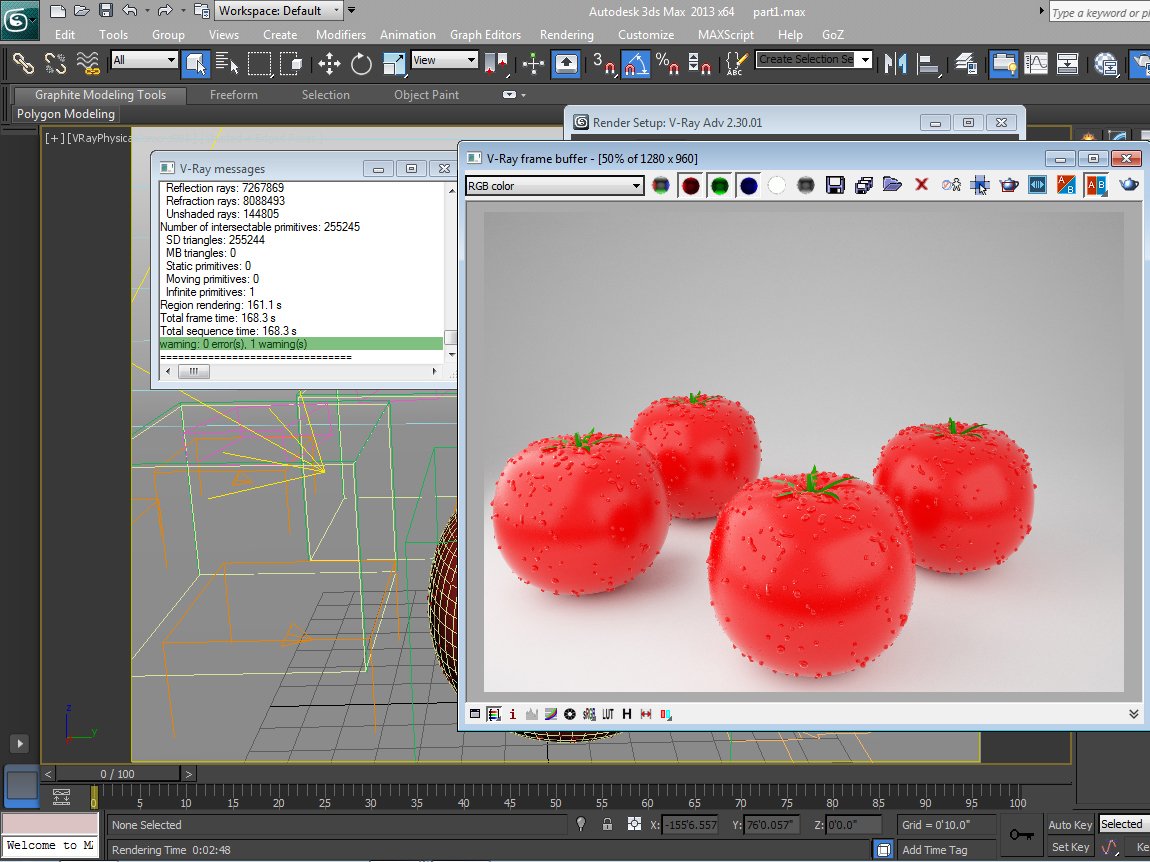
Now I hit render and you can see our final render tomato is looking very realistic (step 21). But still we need to do some adjustment in Photoshop.
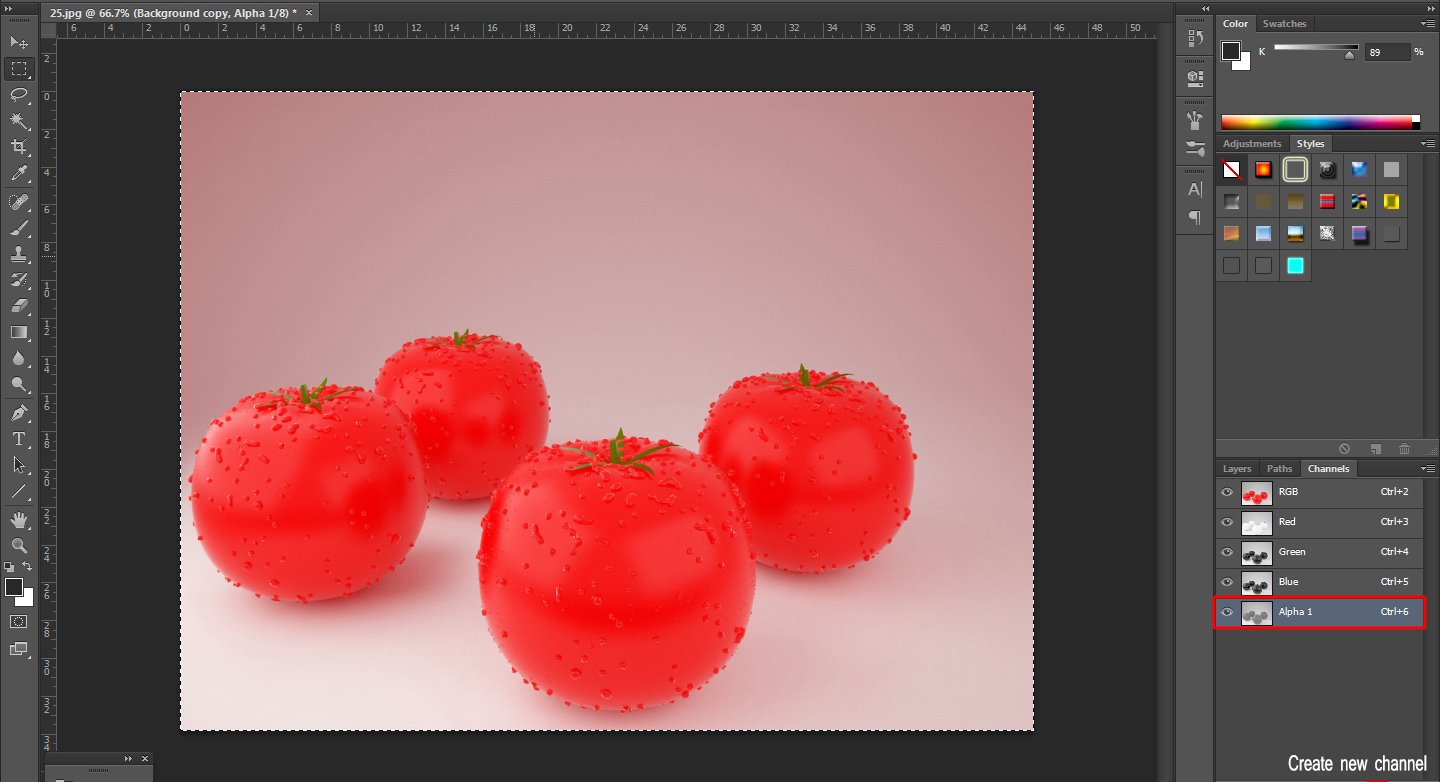
I open my Photoshop. First I make the copy of my background layer. After that I import the Z-Depth pass. I put this layer up to the background copy layer. Now hit Ctrl+A and than Ctrl+C. Now go to the background copy layer go to channels create new channel as shown in step 23 than paste the Z-Depth layer in it.
Now you can see our image has red tint step 23. I have to fix it first. Now go to the background layer and then again the background copy layer you can see our tint is gone.
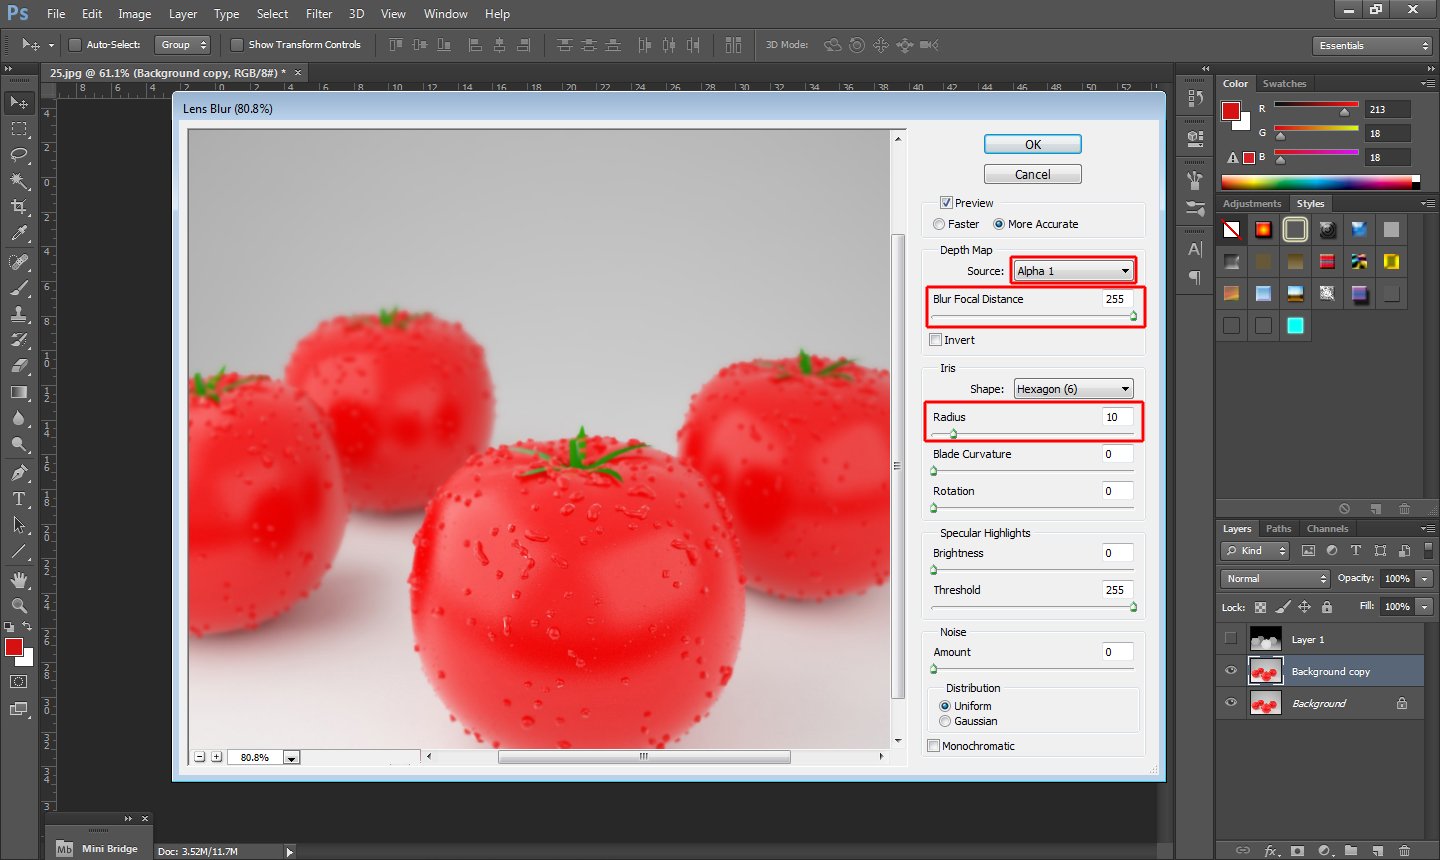
Now go to the filter/blur/lens blur and start tweaking. You will get a nice depth of field effect as shown in step 24.
Final:
